The CrossFit code is ‘to become ready for any-and-everything.’ If you’re looking to get better at pack-horsing heavy stuff, none do it better than Everest sherpas and the military. The former are tough to pin down but the latter clock plenty of hours under a ruck.
Not only is it simple, it’s also an incredibly effective way to torch fat, while also working the legs, posterior chain core and various ancillary muscles.
At face value, there’s little more to rucking than walking with a book bag, something you did in grade school, but one misstep in every sense of the word is an injury waiting to happen, so here’s how to strategize so you can revel in the right kind of burn.
Fit the rucksack to feel the Bergen burn
Step 1: Before you start out, make sure you pack light, bulky items in the bottom of your ruck and the heavy, dense items in the core of the ruck so that the weight is evenly distributed.
Step 2: Adjust the hip strap, seating it more or less in line with the top of your hip bones, and tighten to a comfortable setting. The bulk of your load should be worn on the hips, close to the spine.
Step 3: Adjust the shoulder straps, tightening them to ensure your load is squarely on your hips and so your shoulder straps lie fl at against your shoulders.
Step 4: Adjust the stabilizing (lifting straps) so they’re at a 30-45 degree angle, bringing the load closer to the spine to avoid sagging during your training. It’ll help on the move.
Step 5: Adjust the sternum strap, cinching it to a comfortable fi t across the chest and setting the shoulder straps to a width that allows for free movement of the arms.
Carry on carrying on
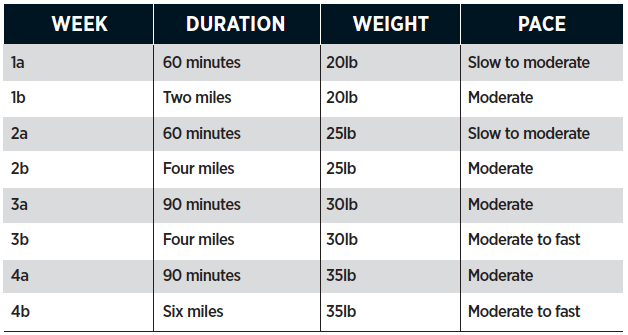
The following four-week plan will consist of two ruck marches per week with increasing duration, weight and variable pace.
At-home military grade
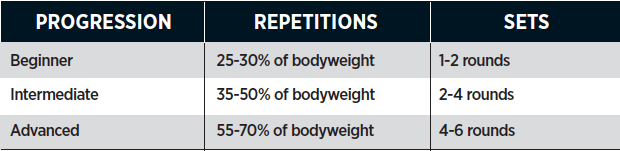
Reps will be calculated as a percentage of bodyweight and will ascend as necessary to remain a challenge throughout. For example, bodyweight X prescribed percentage = total reps, meaning a 180lb beginner would do 45-50 reps per exercise, for one or two rounds.
1. Push-up to weighted push-up progression
Rise to your toes, supporting your bodyweight on your hands and feet. Lower your body to the ground, maintaining a straight line throughout the torso and complete the repetition by pushing back up.
2. V-up to weighted v-up progression
Lie flat on the floor with arms extended overhead, palms facing the ceiling. In one movement, lift your legs with toes pointed and raise your upper body while reaching for the ceiling.
3. Pike push-up to handstand push-up
These are push-ups, but with your body in the shape of an inverted “V” or in a handstand position.
4. Pull-up to weighted pull-up progression
Try using Iron Gym Total Upper Body Workout Bar – Extreme Edition.
5. Walking lunge to weighted walking lunge
Step forward, lower your hips to the floor by bending both knees to 90 degrees. Plant the heel of your lead foot while pushing off with the back foot and complete the rep by stepping into a lunge on the other side.
6. Squat to weighted squat
Strap on a rucksack, ensuring the contents are balanced on your hips. If looking to add a further degree of difficulty, grab a sandbag.
7. Plank / side plank
One-min hold, one-min rest, per variation to complete the circuit.
For more workouts, sign up to the TRAIN newsletter and also receive a 12 month digital subscription to the magazine.