If you want to lift big, you need to prepare properly. Here’s the squat warm-up that’ll ensure you’re always rising up stronger, fitter and with more power. Get ready for great gains.
The aftermath of a solid squat session can make you stagger like a drunkard with even the simple act of sitting on the toilet becoming an agonizing affair, yet it’s this exercise that offers the most fundamental movement pattern everyone practices on a daily basis.
Whether you are at the grocery store putting the pack of water under your cart or squatting down to put on our shoes every morning – squats are what you do. For an athlete, the squat is even more monumental. For most athletes, being in an ‘athletic’ position or ‘ready’ position is a necessity and having the appropriate pre-requisite range of motion and access to strength in this position is a huge determining factor when it comes to athletic performance.
Now, I see many different types of squats at the Onnit Academy, due to the wide variety of our clientele. For the NFL linemen, it’s more of an ‘ass’ back approach where the hamstrings and posterior chain receive a little more activation than what you would see with your mixed martial arts athletes who take an ‘ass to grass’ approach, placing more stress on their hip adductors and anterior chain.
Finding the perfect squat
Your first question may be which version of the squat is better than the other? There is not a strict, gold standard answer that is true across the board for everyone because the right answer is, ‘it’s what is necessary for the individual.’
If you are an athlete with anterior knee pain or ankle issues, chances are I will not have you squatting ass to grass due to the stress on certain tissues. Although the benefits of ass to grass squats would be aiding in releasing the tension built up in your hip adductors and giving you more access to strength in this relative position, there are other ways to effectively open range of motion without putting yourself at risk of future injury.
Also, ask yourself this important question: do you squat a certain way because you need to squat this way (due to only having access to this form of squat), or do you choose to squat or move a certain way because you want to? Being observant to the many structural differences between athletes and general population, the following images will serve to speak to three different movement prep (aka warm up) exercises that will help you do the following:
1. Access more range of motion in the hip region
2. Gain strength and activation in the lost ranges
3. Prep your body before squat day
Your best ever pre-squat warm-up
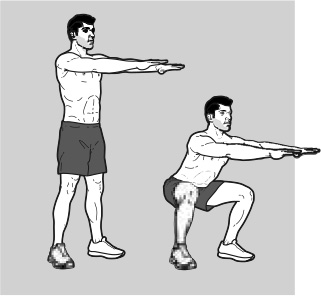
1. Bodyweight squats
Start off by doing 5-10 bodyweight squats before completing these exercises then test your bodyweight squat following these exercises.
You should notice greater mobility in your ankles, knees and hips. Not only will this warm-up help you beat your squat PB, but you should not feel as sore the next day and you will have protected yourself against future injury.
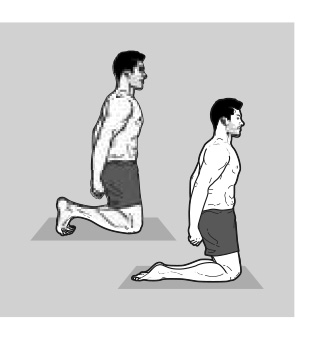
2. Kneel to tiptoes
Complete 3 sets, holding 20 seconds of rest between sets.
Begin by folding all 10 toes so that the top sides of your feet and toes are facing directly towards the ground. Sit directly on your knees and make sure your hips are shoulders are stacked in a vertical orientation. Hold for 30 seconds
Ensure the bottom surface of all 10 toes are in contact with the ground. Now, pull your heels up towards your butt. Shoulder and hips are stacked in a vertical orientation. Hold for 30 seconds.
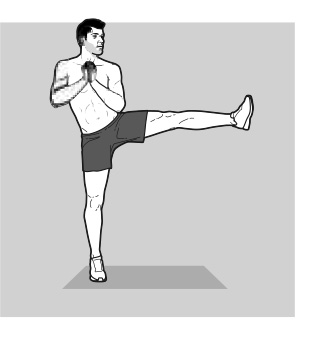
3. Single leg lateral hold
Complete 3 sets, holding 30 seconds of rest between sets
Begin this movement by turning your hips/toes inward so that your toes and ankles are pointing directly across from your working leg. From here, keep your leg locked and raise it up to the side wall. Only go as far as you can without leaning over to a side or losing the locked-out leg. Hold each leg for 45 seconds.
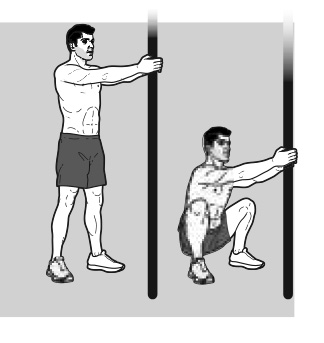
4. Squat pole
Complete 3 sets of 5 reps (5 second hold), with a 45 second rest between sets. Note that the pictures are a progressive checklist through a single rep.
Begin with your feet slightly wider than hip-width apart and turn your toes out. Allow your knees to shoot forward over your toes and tracking outwards towards the side walls making room for your pelvis to fall right in between your feet. At the bottom, really fight to tuck your pelvis forward, knees outward and feet flat.
Upper body mechanics: make sure your pelvis and shoulders are stacked in a vertical orientation as well as locked-out arms. This will make sure your shoulder blades are engaged and pulled back.
If you are not able to go as low as the picture depicts, just go to a position that allows you to keep your spine upright, with your arms locked out and feet flat. If you’re feeling some tightness in the inside of your hips, then good job. Hold at the bottom for five solid seconds.
EXPERT
Cristian Plascencia
is the senior durability coach at the Onnit Gym HQ in Austin, TX. Having a degree in Exercise Science , Cristian works with a wide variety of clients, helping people access their movement potential, and assisting in recovery modalities.